PolyPlanar User Guide
Creating a PolyPlanar Setup
- In the Shader Editor, press
Shift+A - Navigate to PolyPlanar
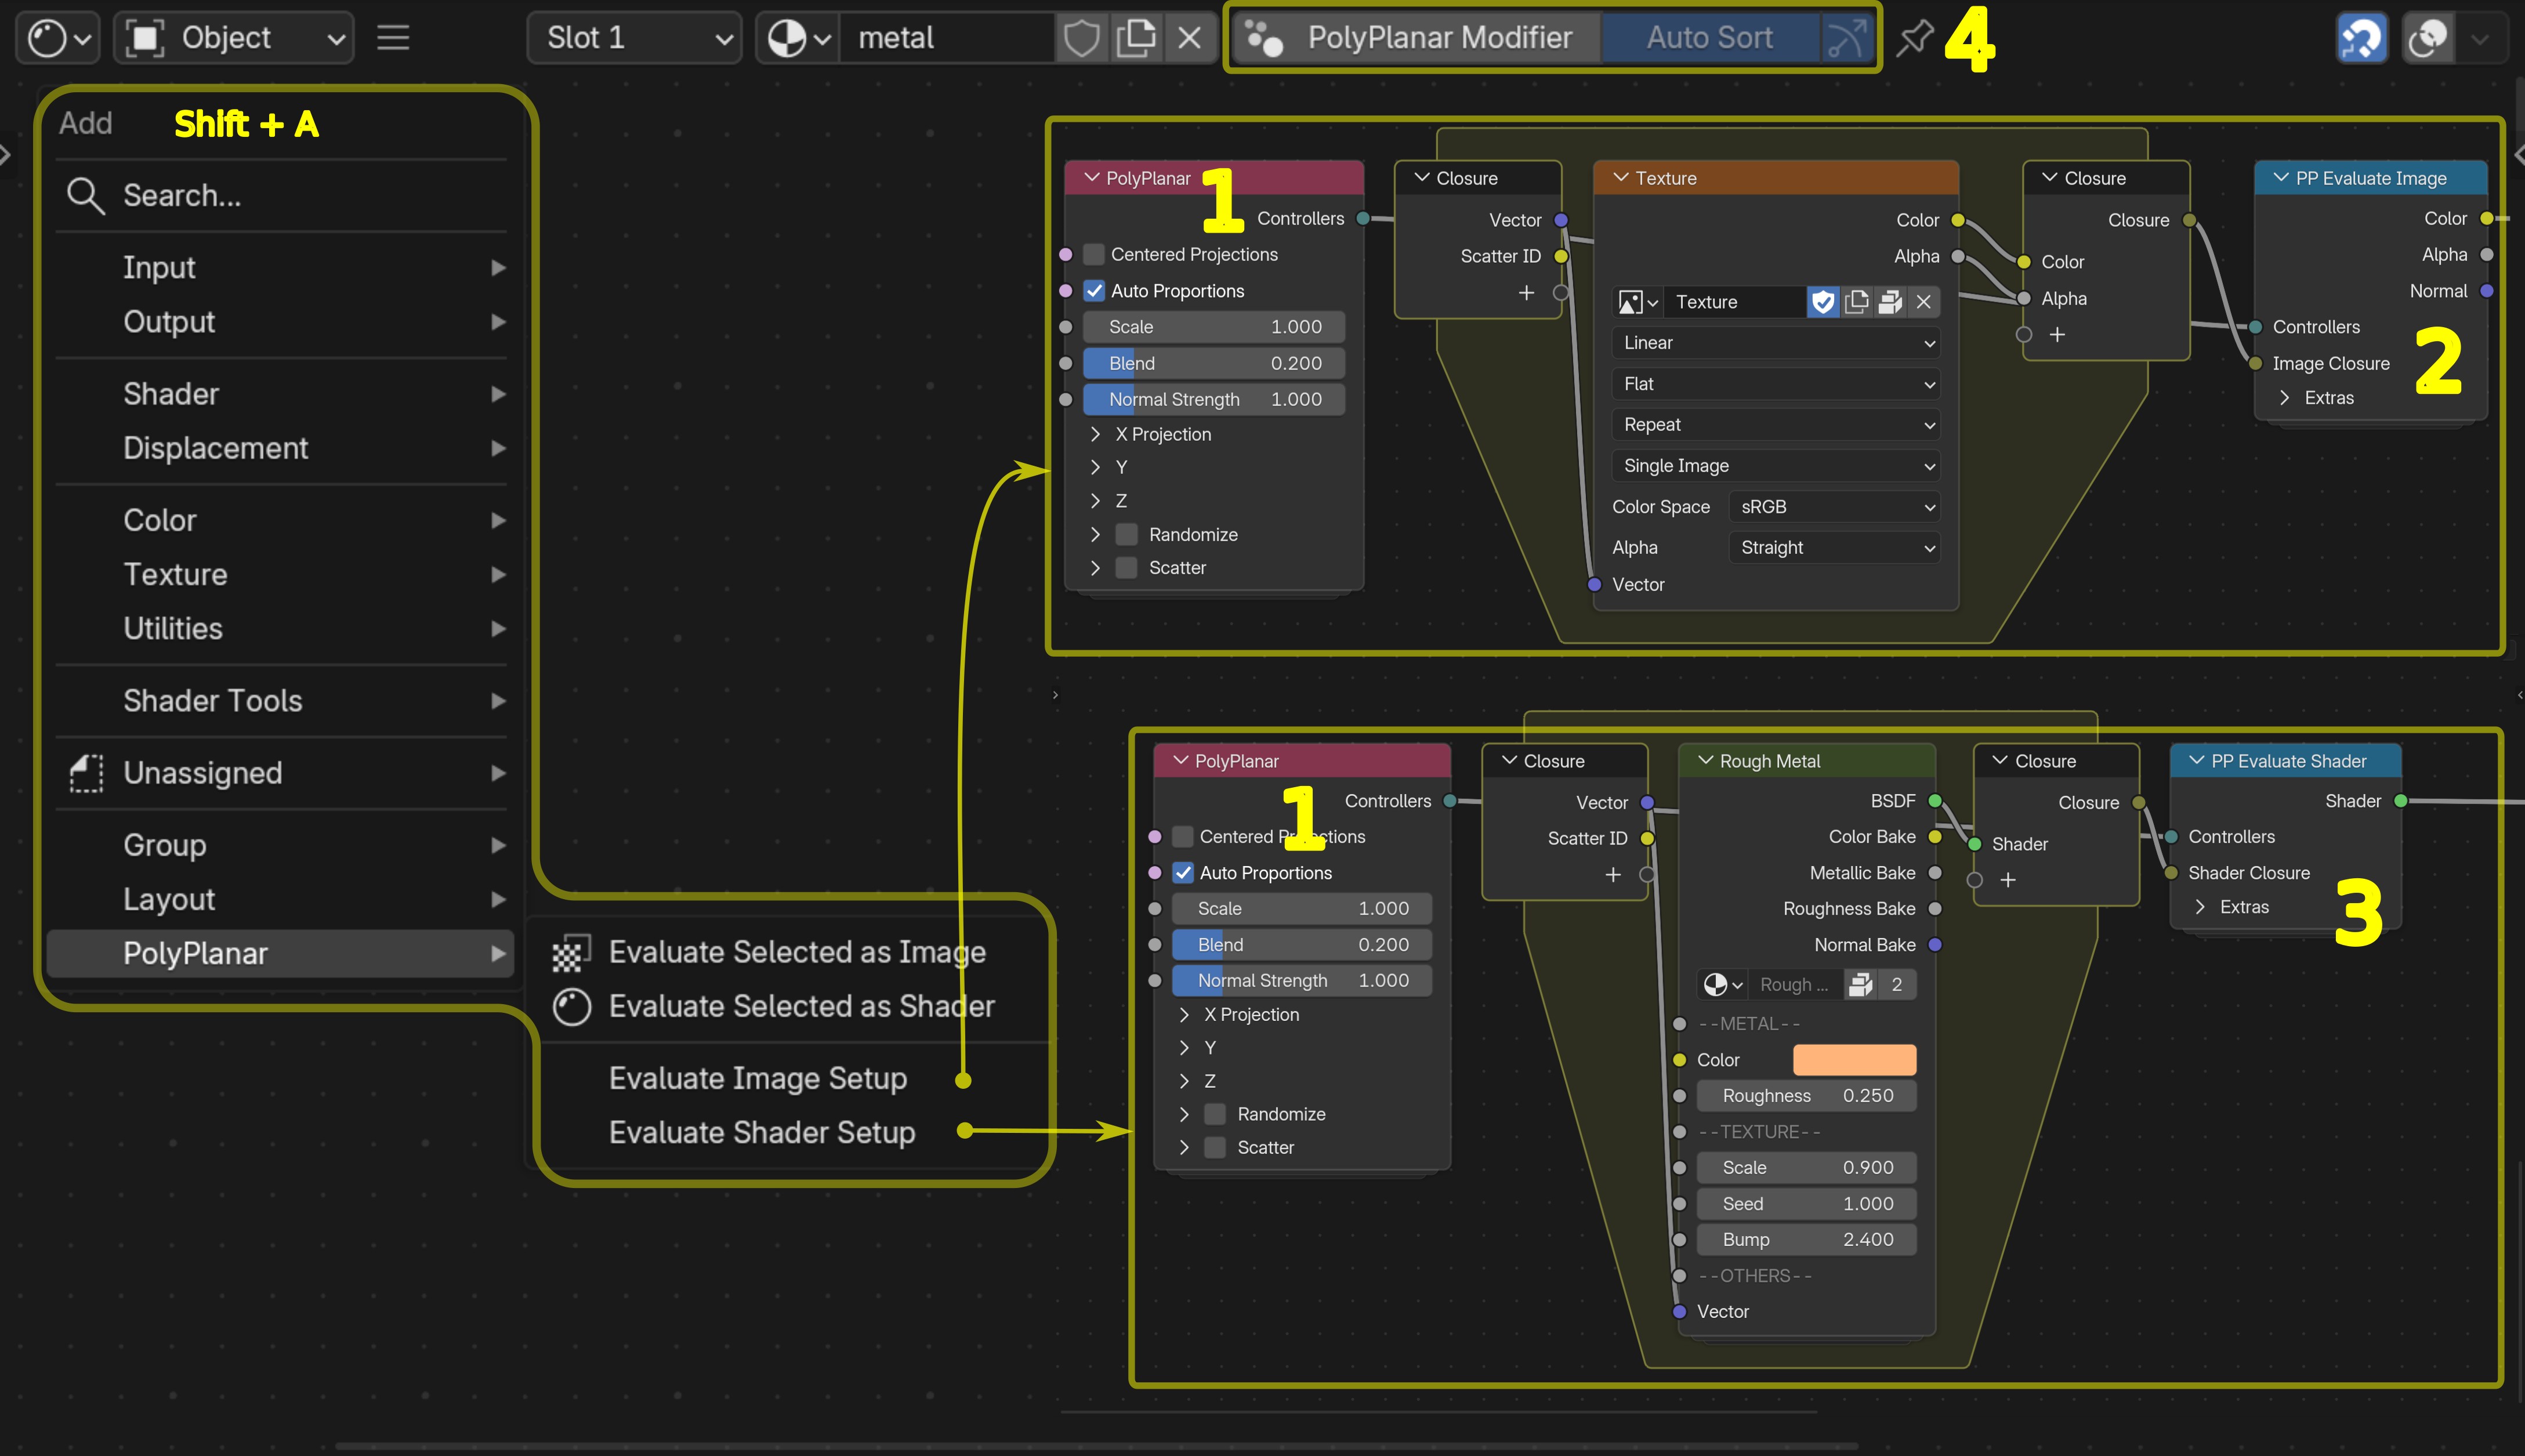
- PolyPlanar Input Node: The main node that enables a triplanar projection ready for deformations with many functions.
- PP Evaluate Image Node: Receive the bundle Controllers from a PolyPlanar input node and a Closure input with the image data to be projected.
- PP Evaluate Shader Node: Receive the bundle Controllers from a PolyPlanar input node and a Closure input with the shader data to be projected.
- PolyPlanar Modifier (Procedural Workflow): The top right corner of the Shader Editor offers the ability to work procedurally while ensuring deformations to work. See PolyPlanar Procedural Workflow.
PolyPlanar Input Node Overview
The main node of the PolyPlanar system is the PolyPlanar Node. It is responsible for the mapping data that will be used to evaluate a texture or shader on an object.
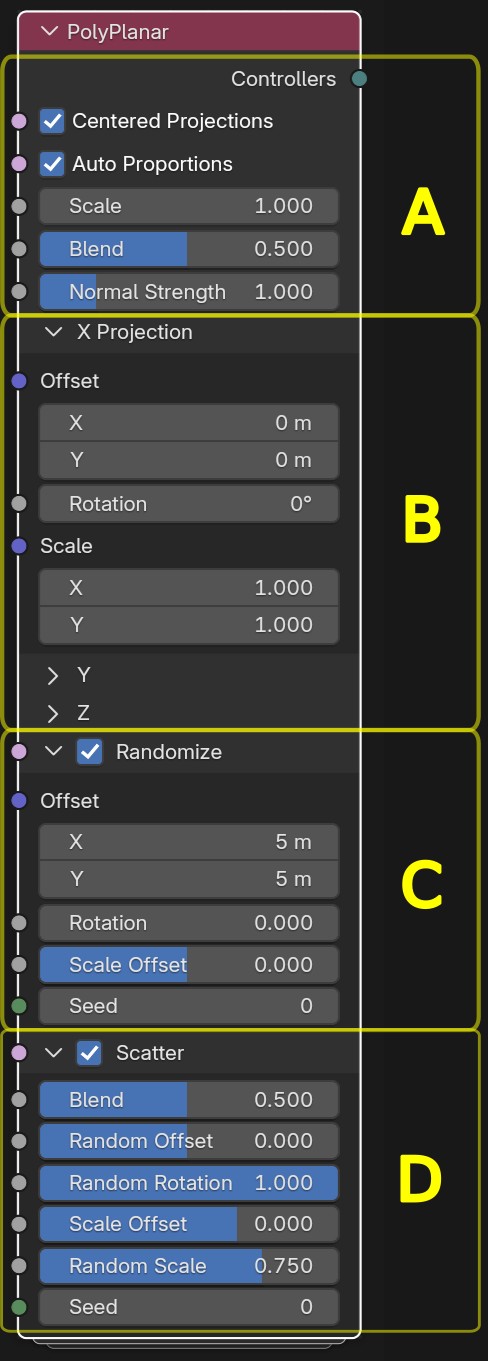
| A |
Controllers Output: Bundle Output with the necessary data to evaluate an Image or Shader. Centered Projections: Centers UV projections. When OFF aligns to bottom left. Auto Proportions: Keep texture proportions even when scaled in Object Mode. Great for ensuring same texture density across all objects using this material without having to apply the scale or manual adjustments. Blend: Blend projections tansitions (Depends on topology). To get rid of artifacts on low poly objects try 0 or use the Procedural Workflow. Normal Strength: Strength of the Normal Output. |
| B | X, Y, Z (Transforms): Individual projection transformation controls. |
| C | Randomize: Randomize projection for each individual object. |
| D |
Scatter: Distributes the selected texture into Hexagonal cells. Blend: Blends over the neighbor cells. Random Offset: Slides the position of the mapping randomly per cell. Random Rotation: Rotates the mapping randomly per cell in a -360 to 360 degrees range. Scale Offset: Offset the mapping scale uniformly on all cells. Random Scale: Adds a scales factor randomly on each cell. Seed: Seeds a unique mapping variation of Offset, Rotation and Scale for every single cell. |
PolyPlanar Evaluate Nodes Overview
The other core nodes are PP Evaluate Image and PP Evaluate Shader Nodes. They will receive the Controllers bundle from the Input PolyPlanar node and the data from a Closure to be evaluated.
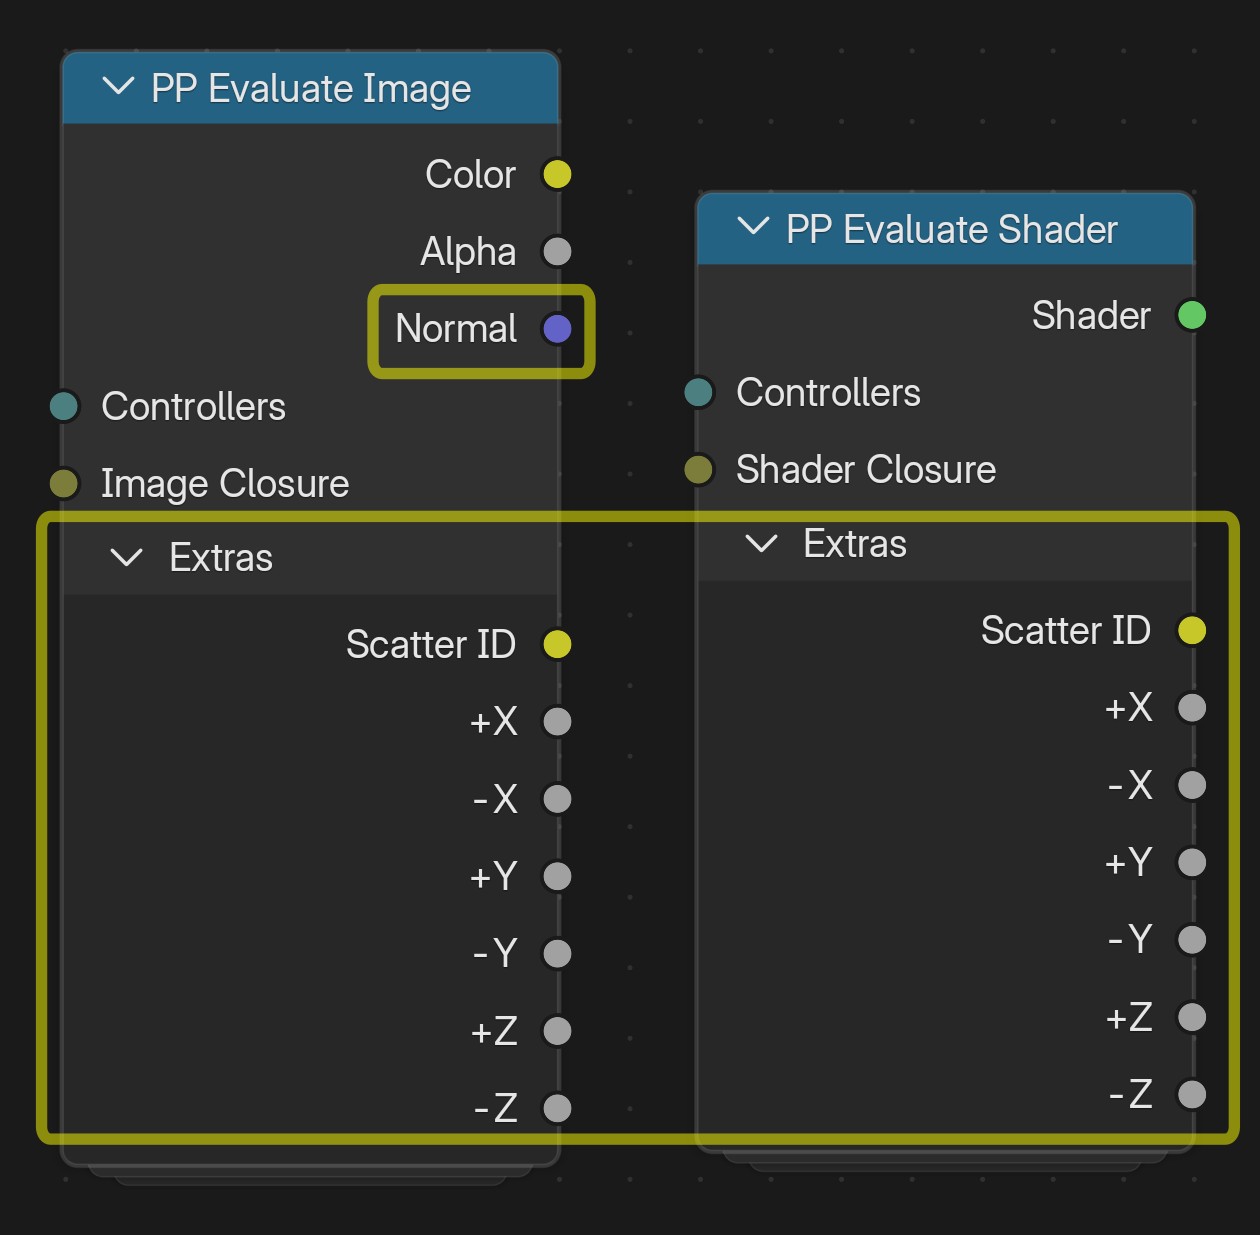
| Normal |
Corrected normals from an evaluated Normal Map in object space. Plug it directly to a BSDF normal socket input. |
| Scatter ID | Random color of cells when Scatter is toggled ON from a PolyPlanar Node. Useful for extracting masks. |
| +-X, +-Y, +-Z | Individual projection masks for each axis. Useful for mixing up different textures or shaders per projection. |
The Base Attributes and the Automatic Management
This part is not relevant to the usability but for the sake of information this is what happens under the hood: As soon as you add the PolyPlanar Node node to your material it will be internally tracked as a PolyPlanar material and the base attributes (polyplanarposition, polyplanarnormal and polyplanartruenormal) will be managed on the base mesh of any object that uses the material by the addon automatically. These attributes are updated whenever needed, like when user makes changes on the mesh in Edit Mode or apply modifiers so they are always up to date on the current base mesh.
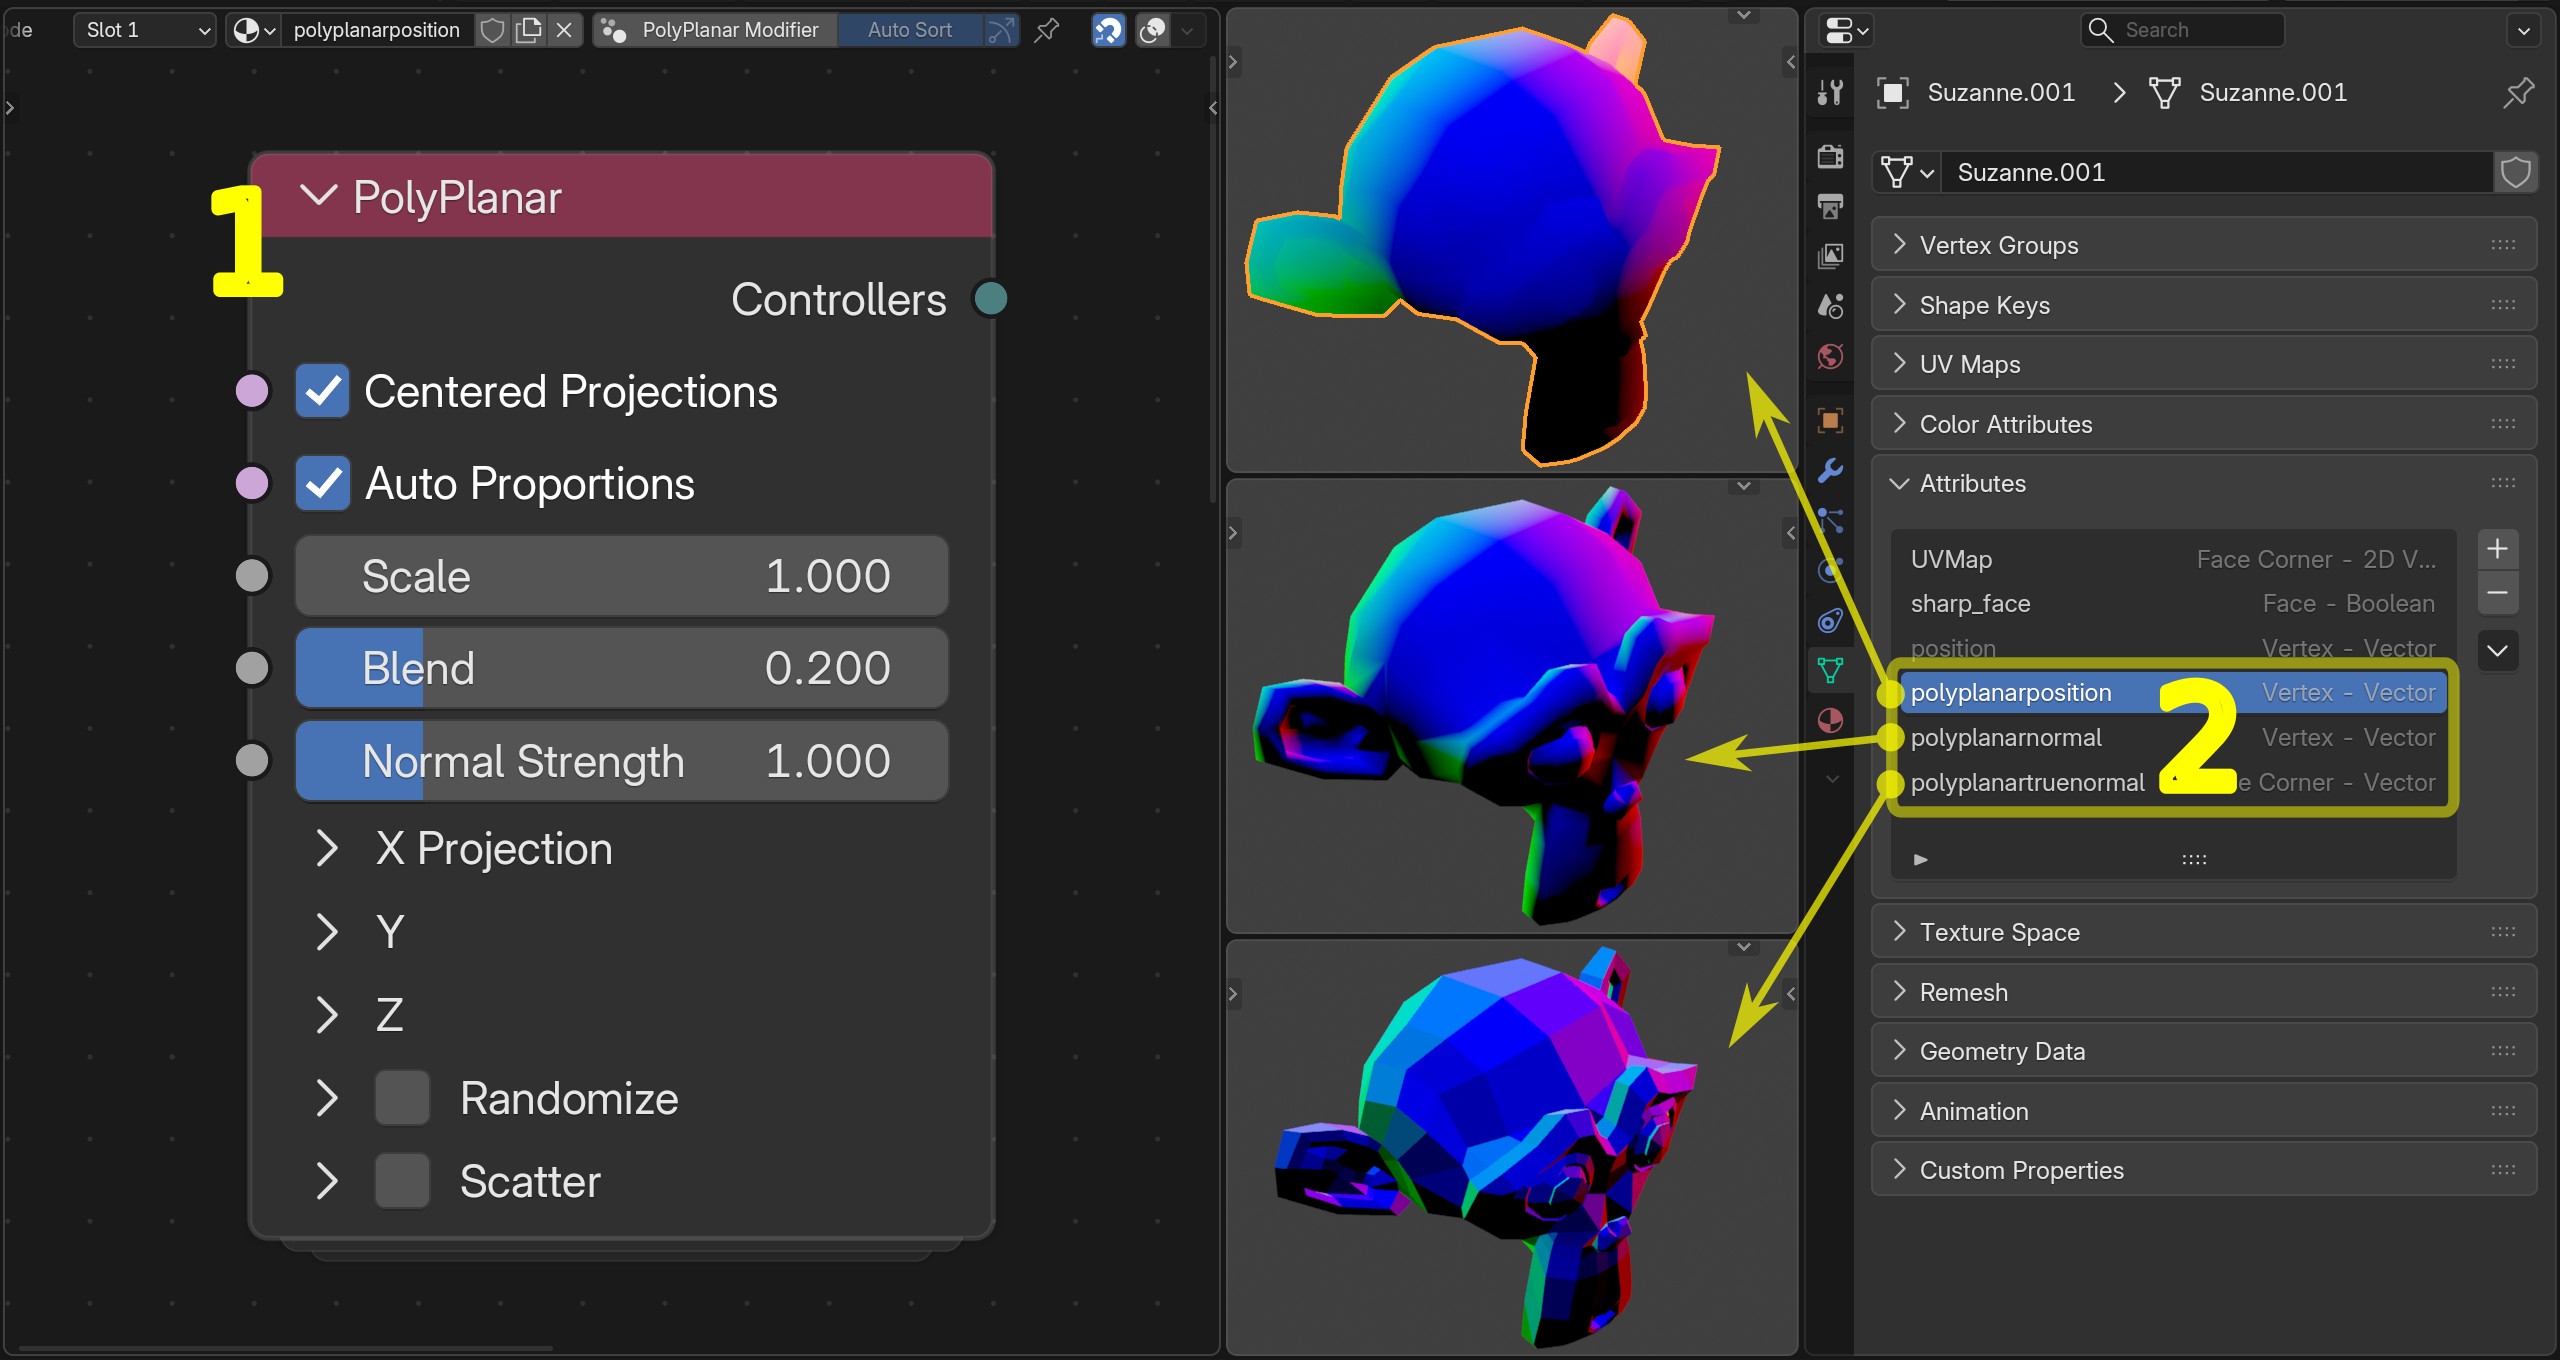
- Added PolyPlanar Node: Triggers the automatic management of the base attributes.
- PolyPlanar Base Attributes: The add-on automatically ensures these attributes will be always up to date on base meshes using the material.
Since they are baked to the base mesh, it means Shape Keys deformations are supported at this point. But if you decide to use the PolyPlanar Procedural Workflow these attributes will be overridden at the modifier level by the PolyPlanar Modifier at the index it is placed at on the stack.
PolyPlanar Procedural Workflow
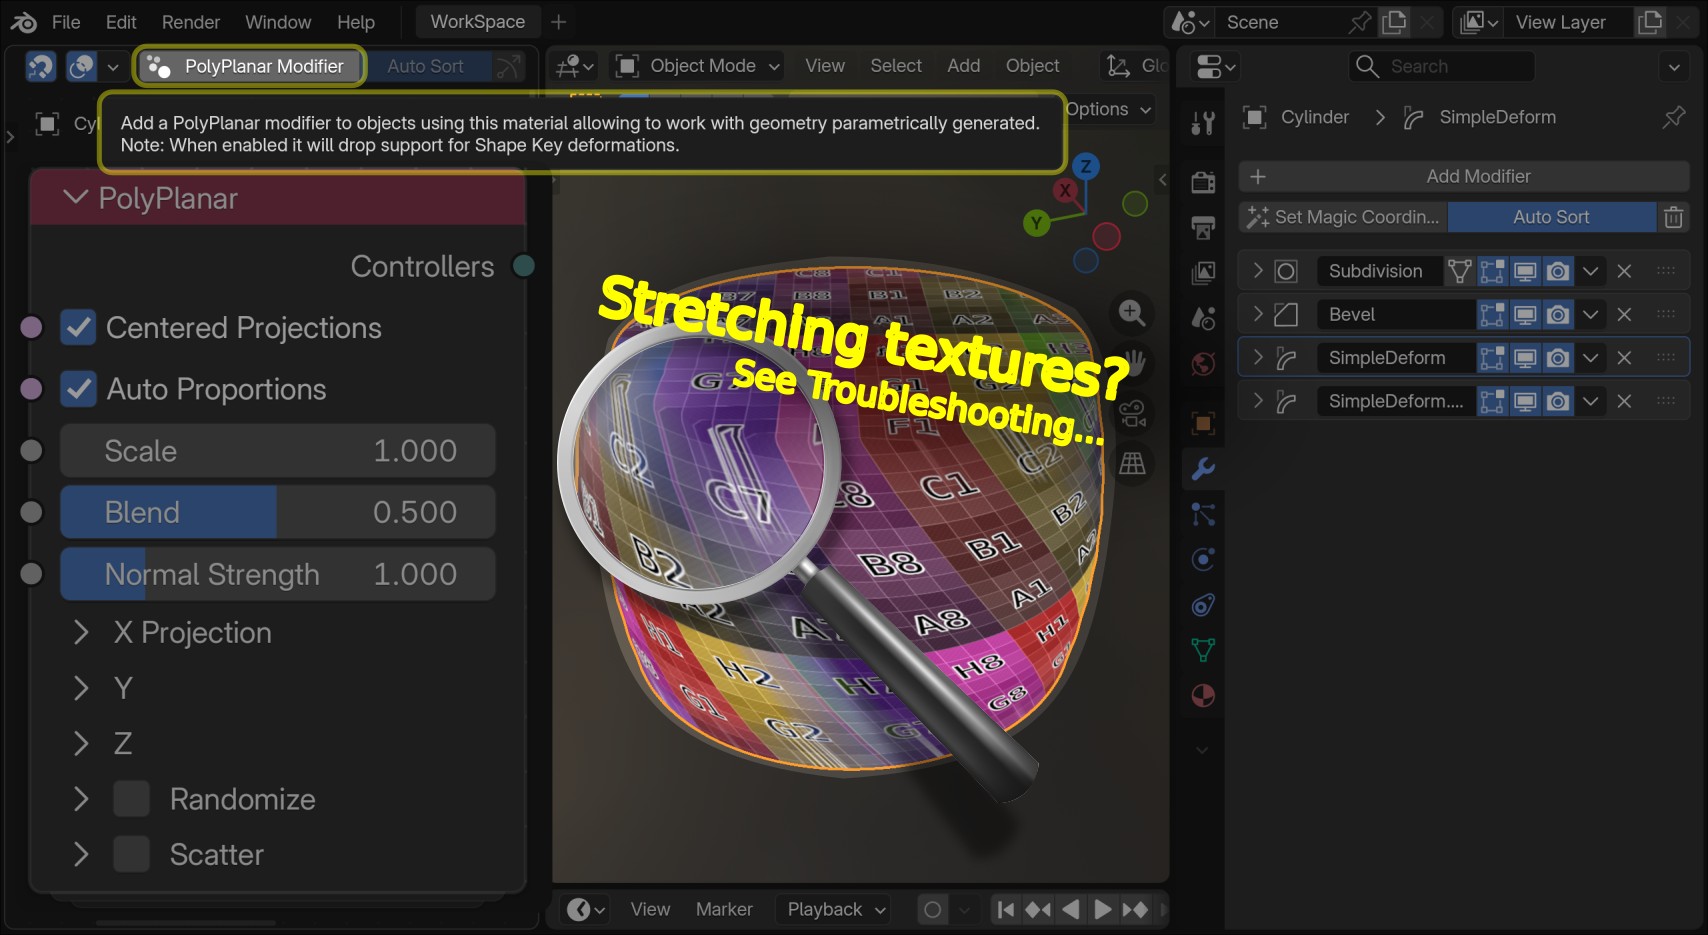 When PolyPlanar Modifier is enabled it will drop the support for Shape Keys deformations because now the underlying attributes that ensure deformations will happen at the modifier's level and it can take advantage of geometry procedurally generated non-destructively. Let's see how it works below:
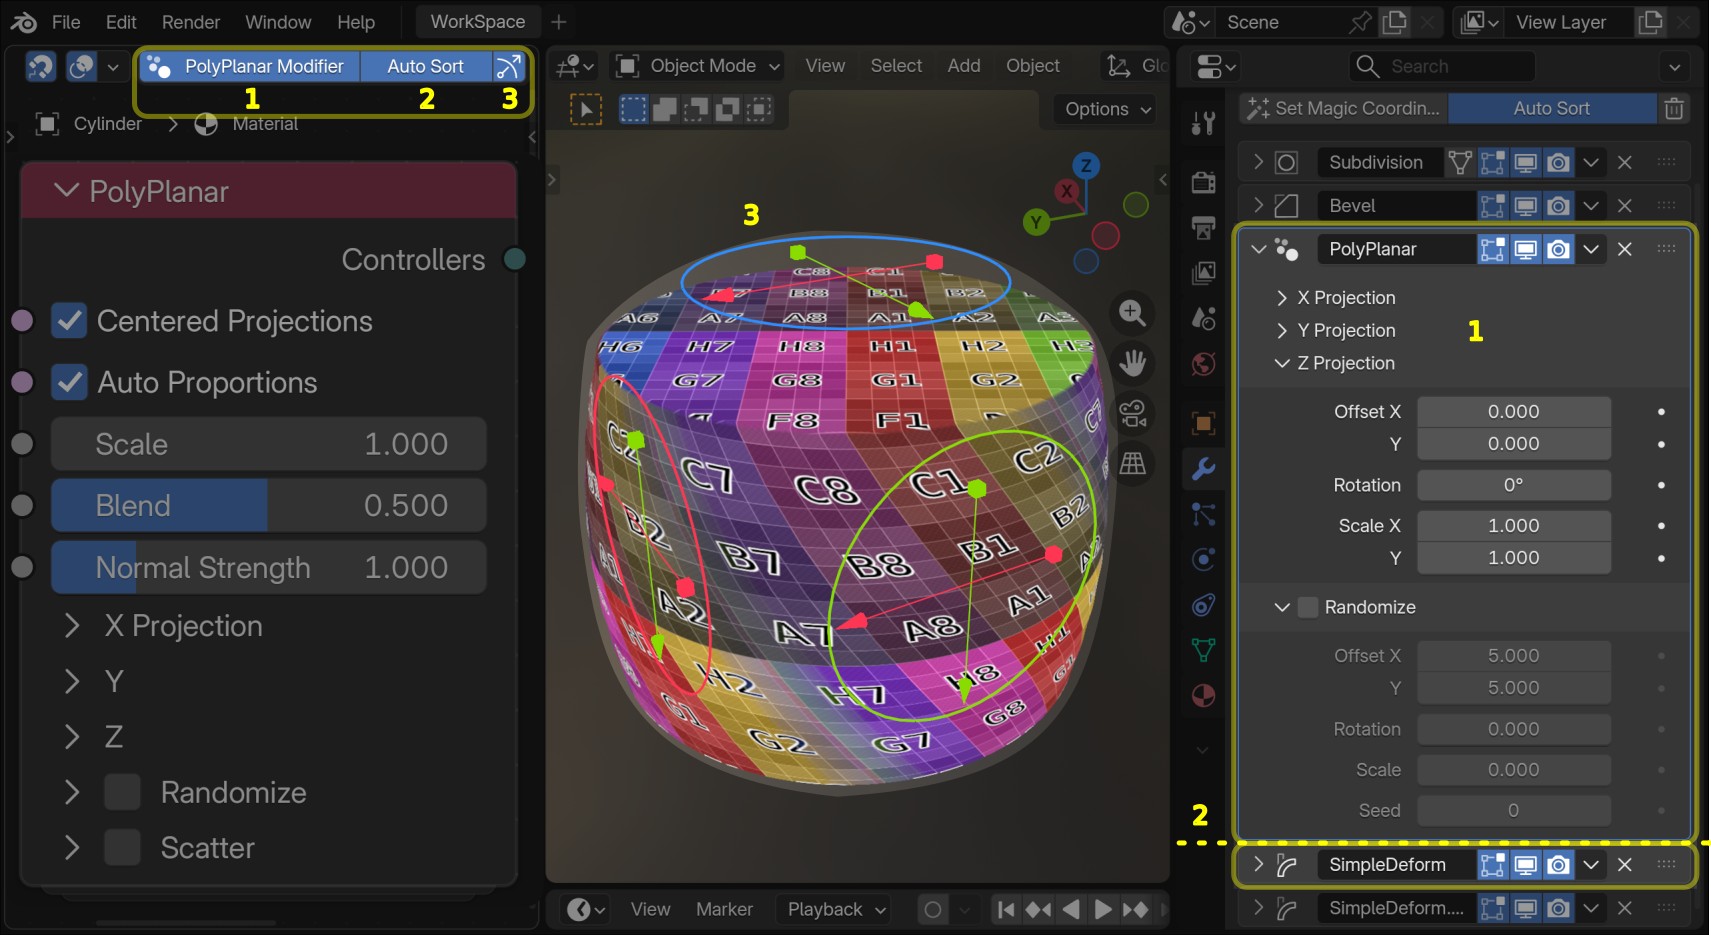
- PolyPlanar Modifier Button: Adds the PolyPlanar modifier into all objects using the material.
- Auto Sort: Places the PolyPlanar Modifier before the first deforming type modifier found (Simple Deform in this case as shown with the dashed lines), ensuring the deformations will work. Note that it solved the stretching on the projections earlier too, because it took advantage of the Subdivision and Bevel modifiers before on the stack (learn why).
- Gizmo Icon: Toggles the displaying of the PolyPlanar Modifier (1) viewport gizmos. The values can be tweaked directly into the modifier regardless gizmos are displayed or not.
Common Use Cases
Take over an usual PBR setup and Scattering
You can select the textures from a usual PBR material setup then Shit A > PolyPlanar > Evaluate Selected as Image. Or finding the same operator from the right click. Now you can enjoy scattering portions of your textures across the surface ready to deform.
Isn't it amazing that it works for deformations and displacement without even thinking about UVs?!
Randomize Texture Mapping
Enabling Randomize will randomize the mapping transformations for every object using this material. This is useful for creating variation in the scene from a single simple material.
In case of multiple mesh joined in a single object you still can randomize per Instance or Mesh Island with the PolyPlanar Modifier.
Blend Textures
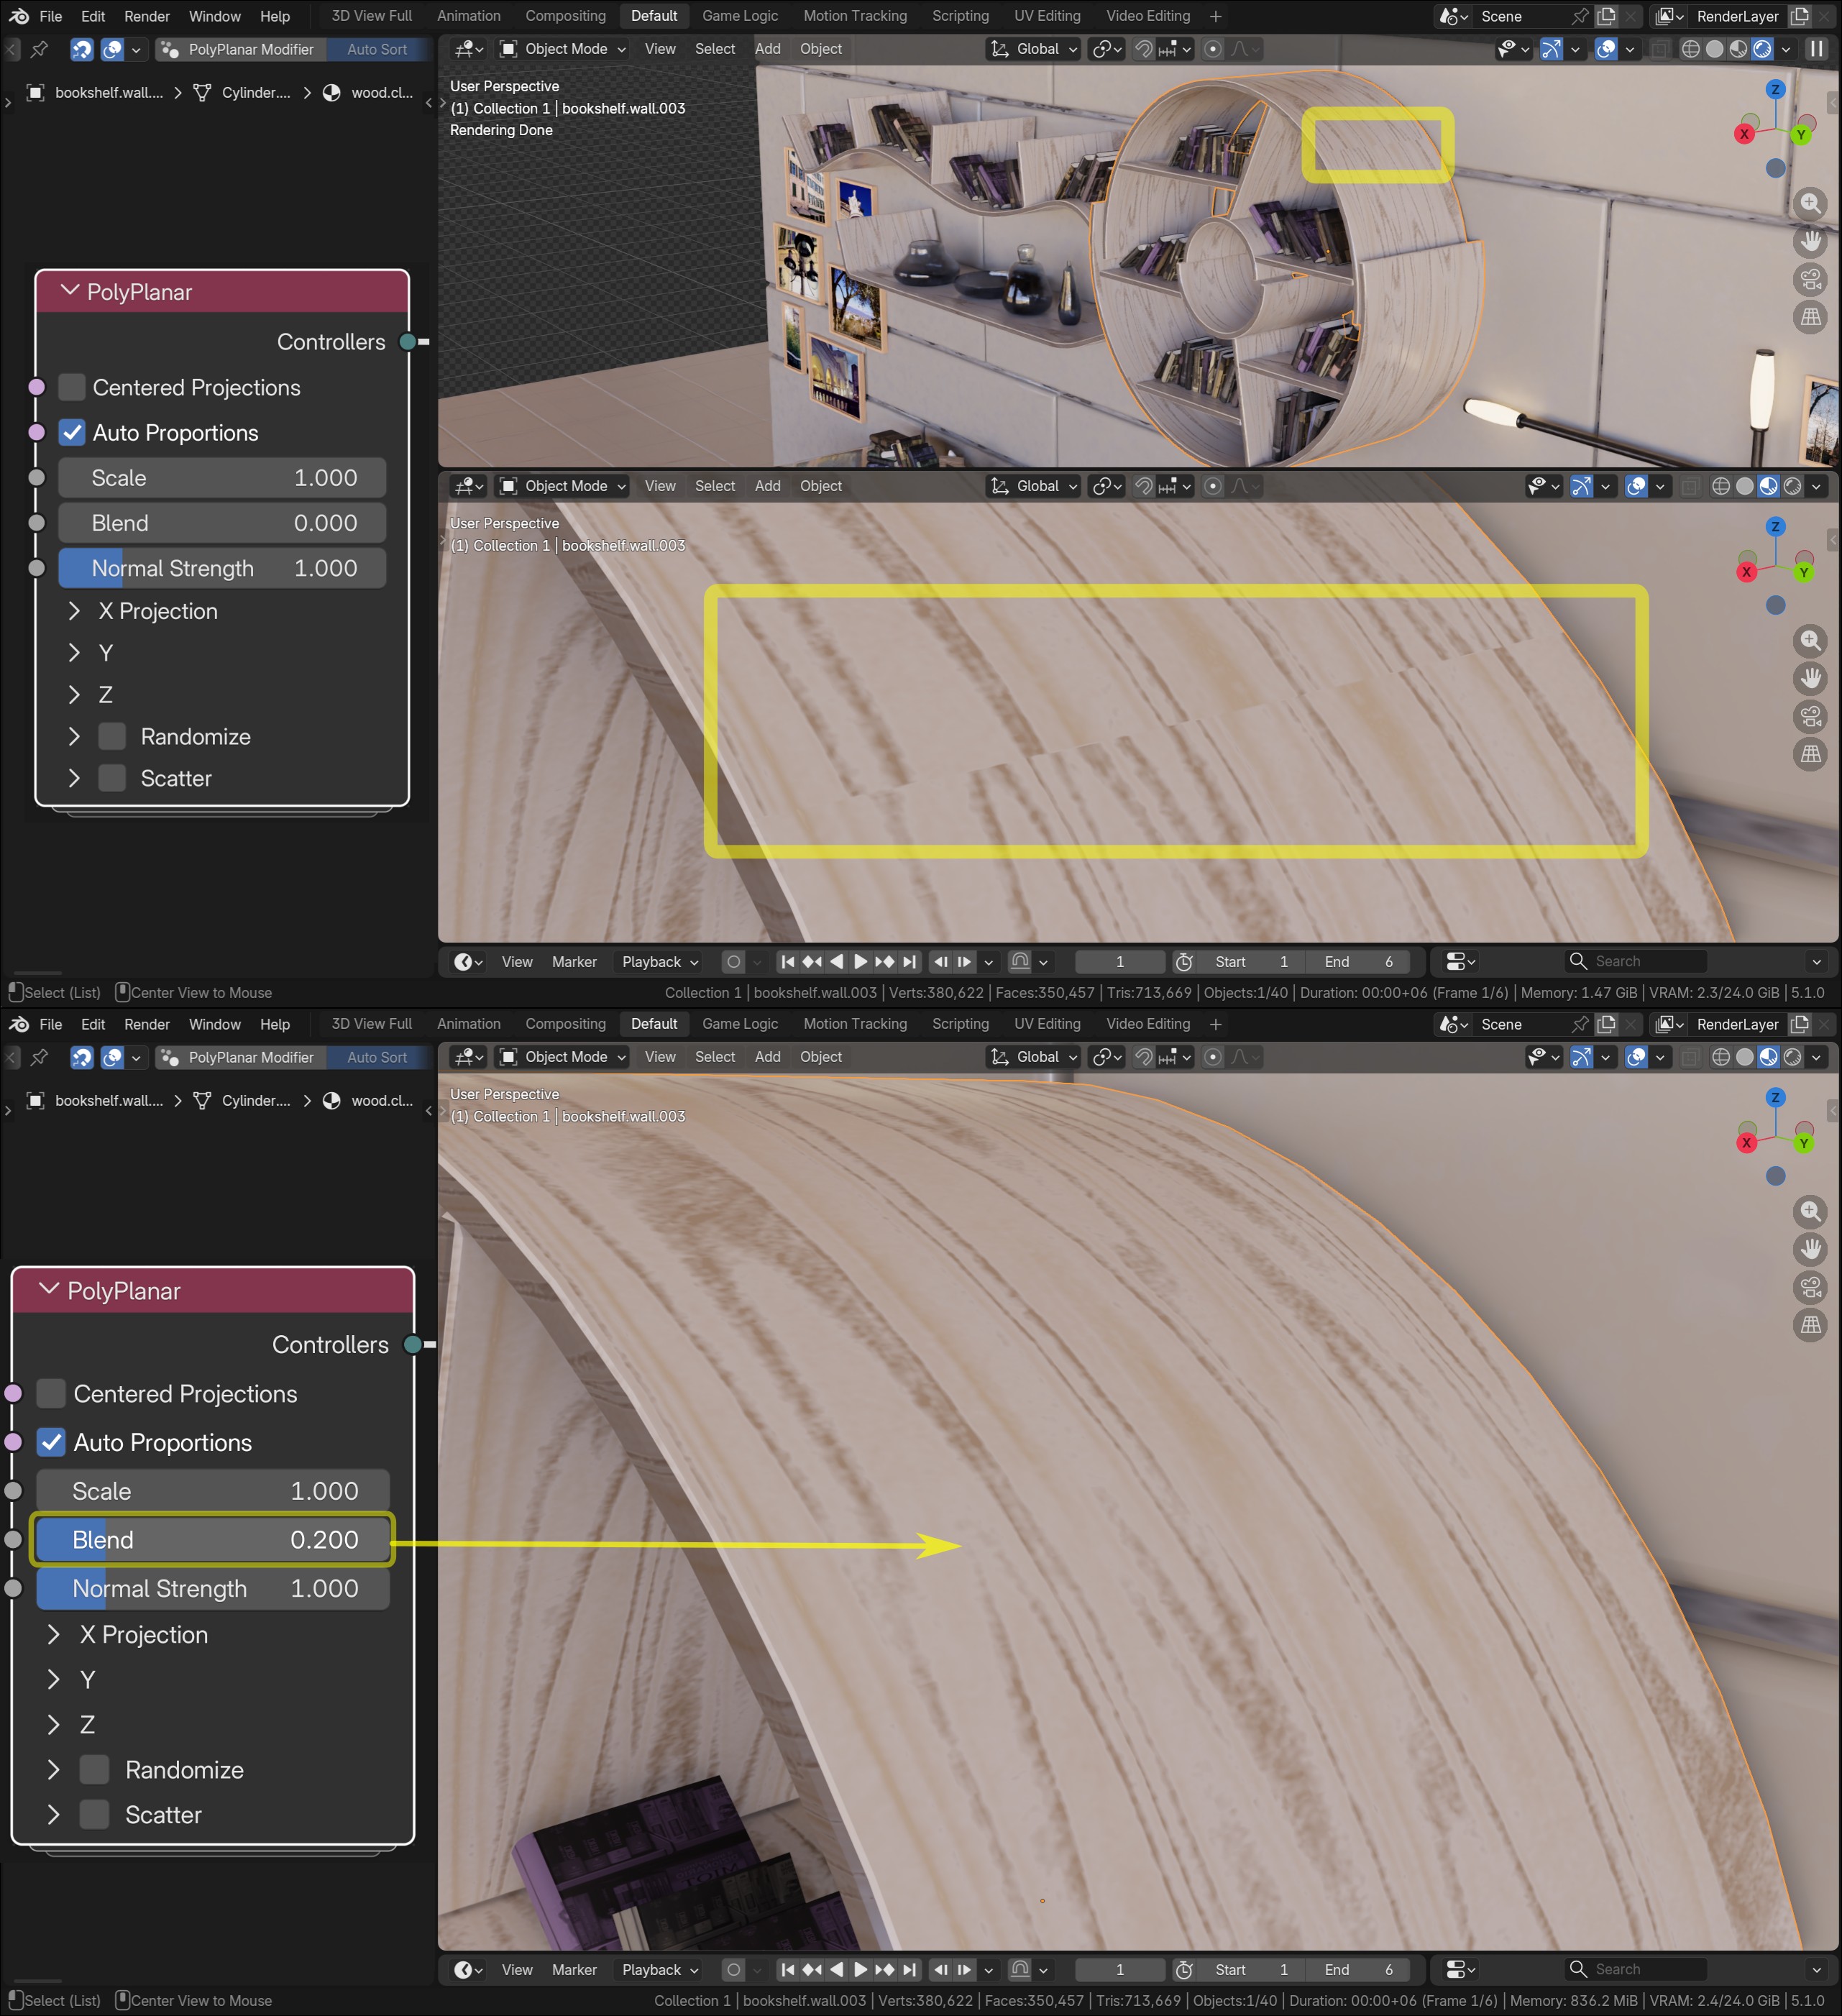
The advantages over traditional UV unwrapping is that with a triplanar projection you will be able to blend textures and avoid visual seams with a single slide:
PolyPlanar Gizmos
When the PoliPlanar modifier is enabled it will allow apply specific projection transformations per object while sharing the material with others. This makes your materials dynamic as possible. The gizmos will show up so you can tweak transformations directly into the viewport:
Normal Maps
Blender's default Box Method (triplanar equivalent) does not solve normal map shading at all. No matter if OpenGL or DirectX neither other settings.
PolyPlanar currently solves it for transformations that does not change the object's topology. If, one day, we can work with screen space derivatives in the shader nodes, we will be able to solve it for deformations too. See limitation below:
Normal Map Deformations Limitation
Notice above that the light casted is being distorted along with the object's deformation which is not the wanted result. Try the Procedural 2D Textures on Deformable Objects workflow which will derive normals from color data fed into the Bump Node.
Best Practices
- Reduce texture resolution when possible
- Simplify node network: if you are working with procedural 2D textures that requires a big node network consider baking the results into 2D textures. Specially if working with EEVEE that has longer compilation time for complex procedural textures.
- Clunkiness when changing parameter values: Set the render engine to Cycles and go to Render View. Now any changes in the parameters will feel smoother. You can switch between Material View to see the results in EEVEE and back to Render View for tweaking as Cycles is more responsive.
Troubleshooting
Issue: Stretching textures
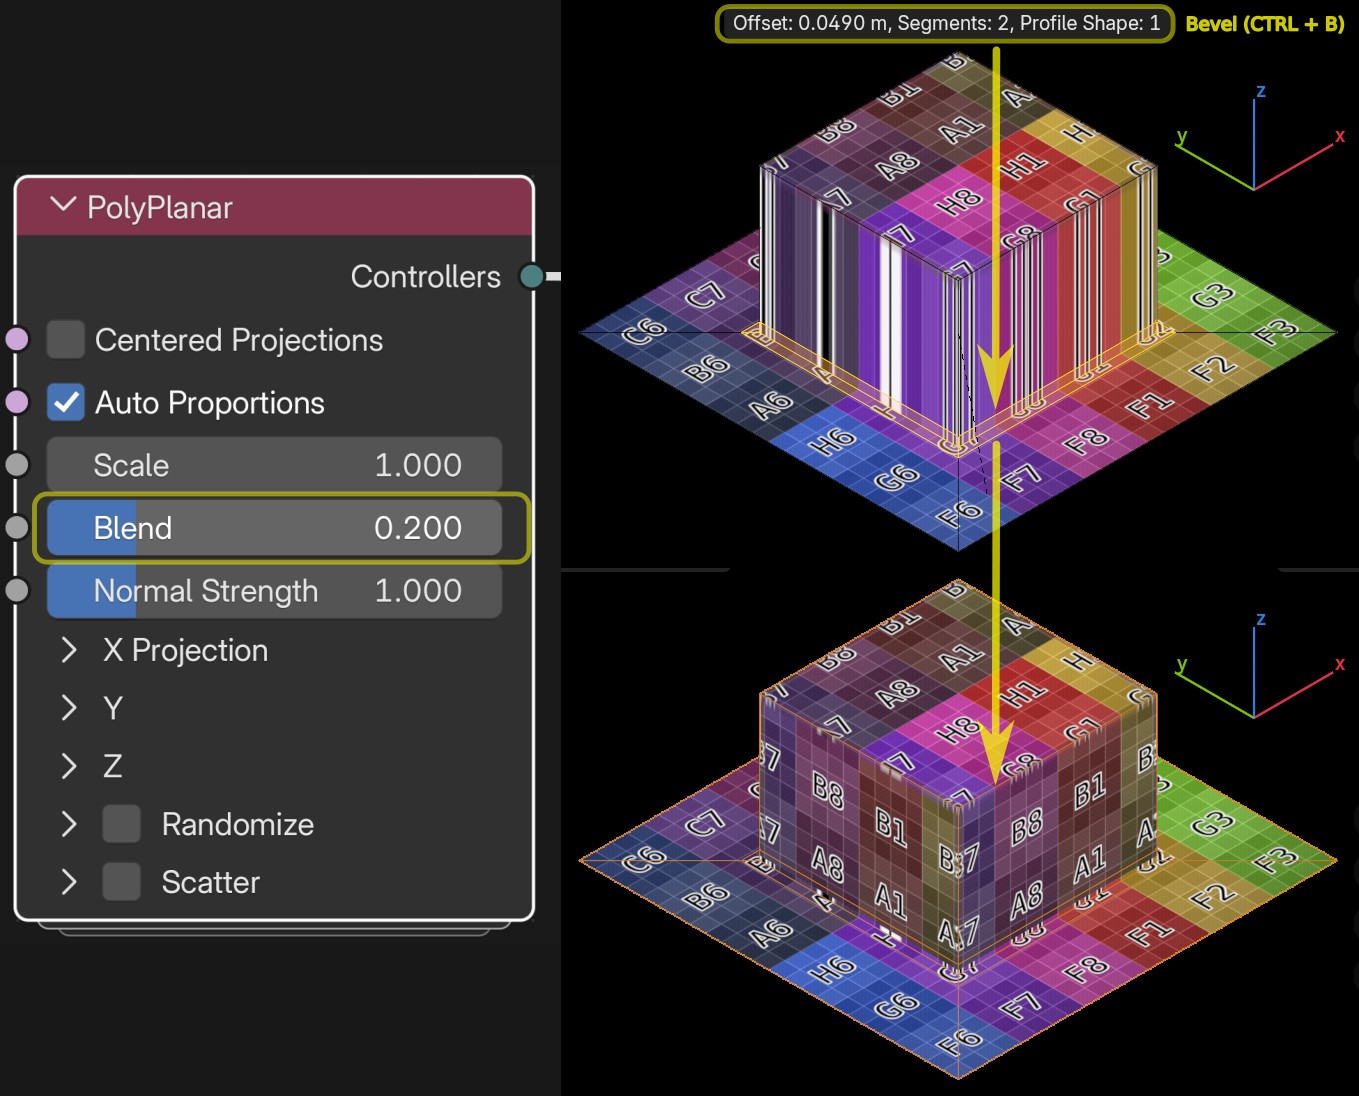
Because this Triplanar method is geometry based, the stretching of textures may appear on high angle differences of low poly objects when Blend is higher than 0. To fix this, you can set the Blend to 0. This ensures to use the mesh's True Normals (non-smoothed-normals) as there is not enough geometry for a smooth transition.
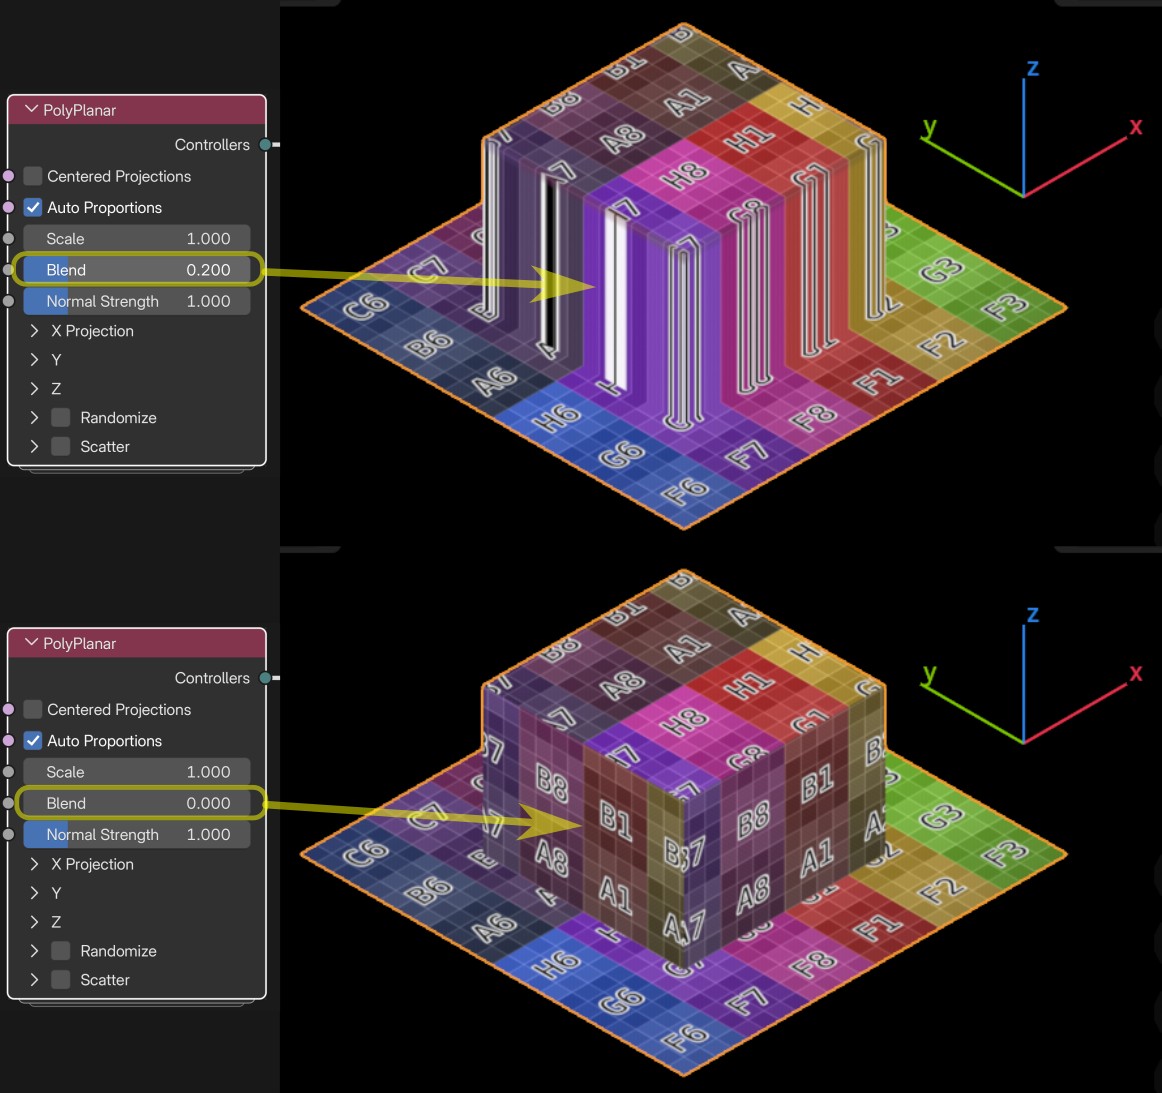
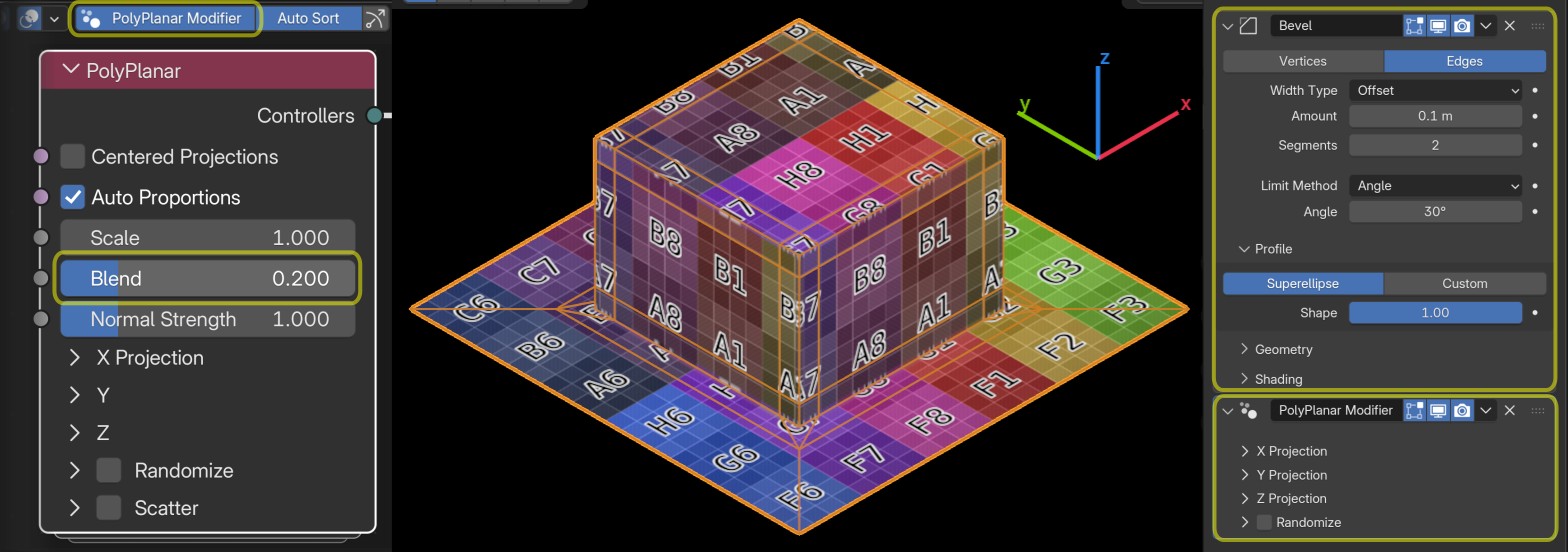
Alternatively, you can add support geometry to stabilize the projections while taking advantage of the Blend parameter. Here are several ways to accomplish this. Destructively or non-destructively:
Destructive manual support geometry
Adding a bevel on the base loop of this geometry will add enough geometry to stabilize the projections while taking advantage of the Blend parameter.
Non-destructive support geometry
Adding a Bevel modifier and activate the PolyPlanar Modifier to enter the Procedural Workflow. This will add enough geometry, non-destructively, to stabilize the projections and take advantage of the Blend parameter. Remember: this will drop support for Shape Keys deformations as now the base attributes are not stored on the Base mesh anymore. If your deformations rely on Shape Keys, use the destructive workflow instead.
For more help, see Troubleshooting Guide or FAQ.